Chenango Dave

Well-known member
Joined
Jul 30, 2006
Messages
333
Reaction score
0
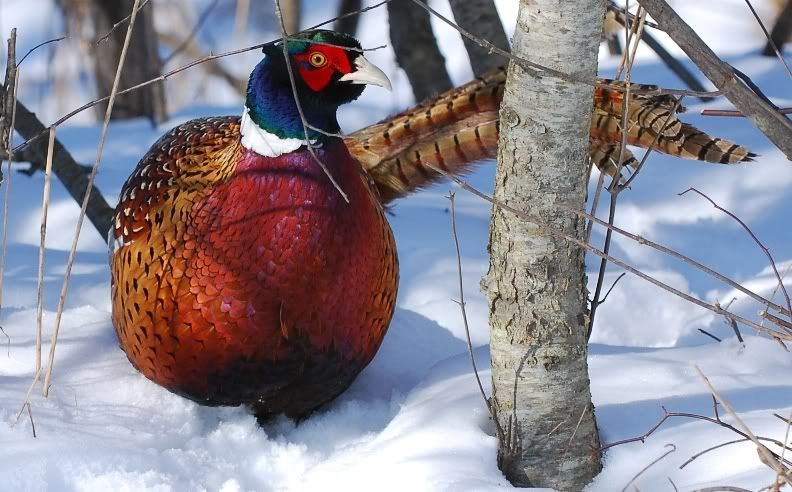
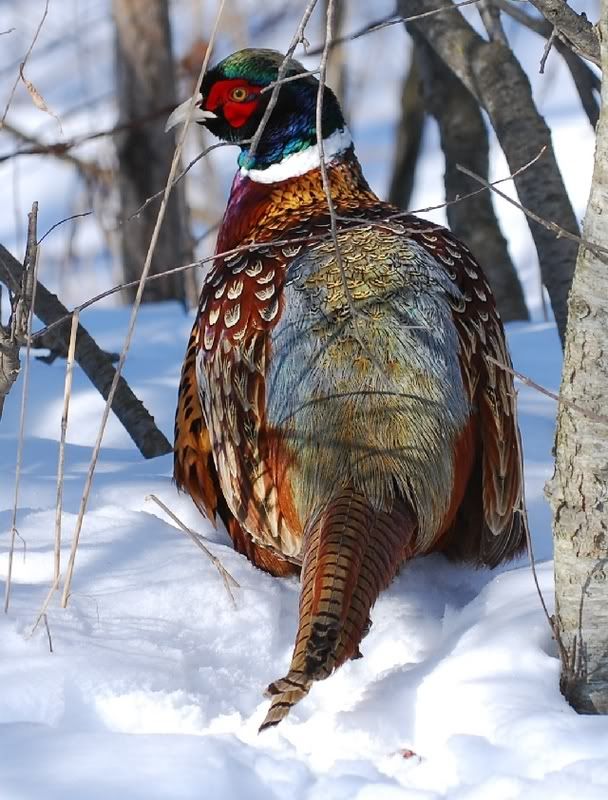
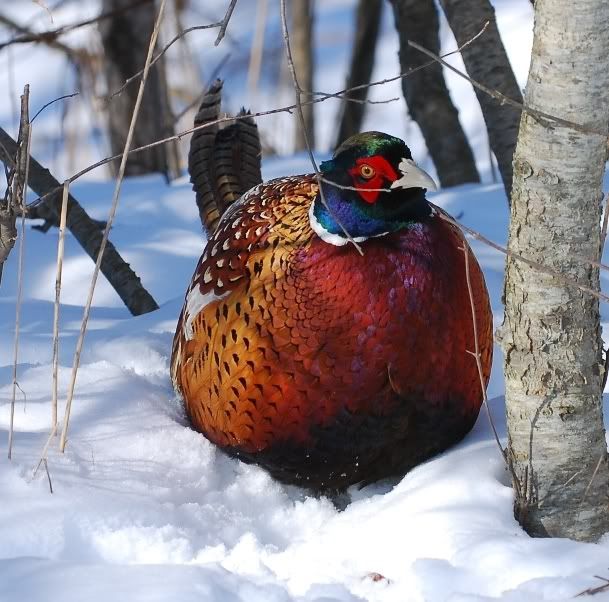
After taking about 20 shots of this single rooster, he finally decided to take to flight and landed in some floral rose bushes -I look up and here he is right next to a hen bird-whats the chances of that happening again? So I snapped a few more of the both of them. I never did see her until he landed next to her..

cock2.jpg


cock1.jpg


cock3.jpg


cockhen1.jpg
 

PaPaBob

Well-known member
Joined
May 19, 2004
Messages
2,624
Reaction score
1
Awesome photos Dave. Thanks for sharing. Love those cock roosters in the show. Certainly brings out their colors . . .
<
 

clutchkiller

Well-known member
Joined
Dec 6, 2003
Messages
2,777
Reaction score
0
So Dave, have any tips on taking better pictures? Keep that up and you'll have to change professions... Nicely done!
 

Hideandwatch

Well-known member
Joined
Jul 26, 2002
Messages
1,306
Reaction score
1
Wow, these are fantastic shots! Thanks for posting them up.
 

rydtime

Well-known member
Joined
Jan 16, 2007
Messages
78
Reaction score
0
great pics, are those the natural colors or are they touched up in photoshop, they are so hard to capture
<
 

Lan-Lord

Well-known member
Joined
Dec 4, 2002
Messages
3,232
Reaction score
1
Those look great Dave.
<
They really pop with the snow background. Phesants are one of my favorite birds to look at. Unfortunately, we dont have them down here on the Texas coast.
 

quailsroost

Well-known member
Joined
Feb 27, 2003
Messages
243
Reaction score
0
Excellent series, what is your exif on these ? how did you determine white balance settings? the snow looks like snow instead of cotton, just great really.
 

Chenango Dave

Well-known member
Joined
Jul 30, 2006
Messages
333
Reaction score
0
Thanks everyone,
I'm using the full 10 MP (FINE JPEG) (Still don't know what I need to do (computer wise) to use RAW). This was a real sunny day so I was using Shutter priority set to 1/500 and the camera chose the aperture of 7.1 I think.
I upped the ISO from 100 to 200. These birds were probably about 15 yards from me and I was zoomed to the full 200 mm. I did not do any post editing except for cropping and resizing.
Also - I was using auto focus with manual over-ride. If I noticed the branches were in focus instead of the bird - I would just tweek it by hand. White balance I believe was in auto. Hope this helps. Its nice knowing how everyone uses the different settings.

Can someone explain to me how the exposure meter works? If there is not enough light will the meter show in the negative range? And if I set the EV up to about 2.3 or so - should the meter start to read towards zero after I have raised the EV? On my camera I can go as high as +5 and as low as -5 (I think) - is the goal to have the camera meter read zero after adjusting the exposure? Or will the meter always read if theres low light or (high light) even after your exposure has been tweeked?

Just curuious cause I took some pics just after dawn the other morning and they turned out just about black. I understand the slow shutter and large aperature theory - but when I changed the EV setting It didn't even seem to make a difference on the meter (still read very low on the negative range after changing it.)
Hope someone understands what I'm trying to ask - I'm not very good with words.

Thanks
 

clutchkiller

Well-known member
Joined
Dec 6, 2003
Messages
2,777
Reaction score
0
Dave, I'm not sure about Nikon, but with my Canon I can see the exposure meter either through my viewfinder or from the LED screen on the top of my camera (it's much easier to keep track of it through the view finder). The meter kind of looks like this -> -2..1..l..1..2+ There is a blinking light that covers one of the stops which are the numbers and dots, if the light is blinking left of center it means that I have an under-exposed image, if it blinks to the right of center I have an over-exposed image. The goal is to have the light blink in the center (with my camera one stop to the right gives a better exposure), I can adjust where the light blinks by increasing or decreasing either my shutter or ISO speed. Your aperture setting can also effect your exposure, personally I try to find the correct aperture setting that will give me good depth of field (plus a good exposure).

To shoot in RAW you will need software capable of opening the RAW files, there are many different programs available for this. And... you really should be shooting in RAW format since you have a brand new DSLR, shooting in JPEG is like owning a Porsche and never taking it out of first gear
<
 

Lan-Lord

Well-known member
Joined
Dec 4, 2002
Messages
3,232
Reaction score
1
Accomplishing accurate exposure is probably one of the more difficult tasks and concepts in photography.

Here's how it works.
When in "multi-meter" mode, the camera assumes that everything in your camera frame averages out to 18% grey (aka middle/neutral grey). If you are photographing something that actually doesnt average out to 18% grey (like a bright snow scene or a black curtain) then your snow photo will come out underexposed (the snow scene which is actually very white, will be darkened because the camera assumes the scene is a neutral grey), or the dark curtain scene will be over exposed (the dark curtain will not look black, but a middle grey tone because it assumes the scene is a neutral grey).

If you put the camera in "spot meter mode", it assumes that when you half press the shutter, that the center point (eg spot) is pointed at something that is 18% grey (eg you are telling the camera this is a neutral grey tone, calibrate all of the other colors/tones/highlights according to this neutral grey spot that I am pointing the camera at).

So, to address your scenario:
<div class='quotetop'>QUOTE </div>
If there is not enough light will the meter show in the negative range?[/b]
Probably what happened, is you had your shutter priority set at 1/whatever sec. The camera metered the scene and tried to add light by raising the f-stop on the lens (eg, opening up the lens to let more light in). The lens has a physical limitation though (f/4?? I cant remember your len's fastest f-stop) and couldn't let in enough light to propery expose the photo. So what happend is when you fired the frame at 1/xyz, f-4, ISO-XYZ there wasnt enough light and the photo came out underexposed. What you could have done is either slowed down the shutter (1/400, 1/300, 1/xyz), or increased the ISO. shutter, aperture, and ISO are all a juggling act. You have to balance each property to properly expose the photo, and accomplish the effect that you want (DOF, freezing action, noise, etc). When you modify the EV in shutter priority, the camera will try to comensate by opening up the f-stop. If the f-stop is already open as far as possible, the EV correction will not increase the amount of light.

You are definitely chewing on the heart of photography though. If you want to pursue proper exposure more, look into what is called "The Zone System". Ansel Adams defined it and it is usually what the pros use to figure exposure. If you want to guarantee proper exposure, I suggest buying a $5 18% grey card. (cant use one with wildlife much). I have a grey card, and it is a great tool to calibrate the camera for shooting pefect exposure everytime. Basically how it works, is you hold the grey card in front of your subject in the available light, and you spot meter it. Basically telling the camera "this is what 18% grey looks like in the available light". Once you spot meter it, you can manually set the exposure (manual mode) for the scene. I highly recommend playing with a grey card if you truely want to guarantee proper exposure, and just learn how all of the settings on the camera works...

Ok, well I just unloaded a pile of info.. hopefully it wasnt too confusing. Fire back any questions and I'll try to answer them.
 

clutchkiller

Well-known member
Joined
Dec 6, 2003
Messages
2,777
Reaction score
0
<div class='quotetop'>QUOTE (Lan-Lord @ Feb 6 2007, 08:36 AM) <{POST_SNAPBACK}></div>
You are definitely chewing on the heart of photography though. If you want to pursue proper exposure more, look into what is called "The Zone System". Ansel Adams defined it and it is usually what the pros use to figure exposure. If you want to guarantee proper exposure, I suggest buying a $5 18% grey card. (cant use one with wildlife much). I have a grey card, and it is a great tool to calibrate the camera for shooting pefect exposure everytime. Basically how it works, is you hold the grey card in front of your subject in the available light, and you spot meter it. Basically telling the camera "this is what 18% grey looks like in the available light". Once you spot meter it, you can manually set the exposure (manual mode) for the scene. I highly recommend playing with a grey card if you truely want to guarantee proper exposure, and just learn how all of the settings on the camera works...[/b]

Chris, I have a gray card and I want to try this. Does it matter how close you are to the card... should the card cover my entire viewfinder?
 

Lan-Lord

Well-known member
Joined
Dec 4, 2002
Messages
3,232
Reaction score
1
I put the camera in multi-meter mode, and try to fill the frame with the card. If thats not possible, then spot meter the center of the grey card. I meter the card while in auto/shutter/aperture modes. I then remember the meter settings and apply them in manual mode.

I place the card right next to what I am shooting and meter it from where I will be shooting. It helps to have someone hold the card if possible. Sometimes depending on how you angle of the card, it will reflect brighter or darker. I just try to average out the angle and the amount of reflection to the camera.
 

Chenango Dave

Well-known member
Joined
Jul 30, 2006
Messages
333
Reaction score
0
Thanks you for your time LanLord and Clutch - I'm at work now but will try and mess with these settings a little more my next time out. At least this gives me a little better understanding of how it works. Thanks again.
What program do you guys use to manage your RAW files?
 

Lan-Lord

Well-known member
Joined
Dec 4, 2002
Messages
3,232
Reaction score
1
I'm not a pro at working with RAW and generally don't do much other than levels and USM in post-processing, but this is my process.
  • Copy files (RAW+jpg) to computer
  • Identify the best/delete the rest with Pixmantec RAWShooter (great tool! used to be free but now Adobe bought them http://www.pixmantec.com/ , not sure if free anymore)
  • Do any RAW manipulations if needed <-- I'm not very good at this yet.. need more time to figure it out
  • convert RAW -> Tif
  • open Tif file in Photoshop and work with it if needed.
 

clutchkiller

Well-known member
Joined
Dec 6, 2003
Messages
2,777
Reaction score
0
Thanks Lan-lord, great info
<


Dave, I think you wont go wrong with Photoshop Elements or one of the other versions. You will do yourself a huge favor by buying a book on which ever program you decide to get, it could take a lifetime if you try to figure out all the in's & out's of one of the more advanced PS software programs on your own.
 

Latest Posts

QRCode

QR Code
Top Bottom